
Definitely not reinventing any wheels here - another wonderful craft as old as the hills. But I still wanted to try it for myself. The alchemy and sheer possibility, predicted or otherwise, of natural dyeing with organic ingredients is mind boggling and the magic, like so many crafts, is best appreciated through experience.
Childhood memories of my craft guru grandmother's old lean-to greenhouse behind her kitchen, bedecked with skeins after skeins of natural handspun fleece yarn, hanging from the roof frame like drippy bunting after a thunderstorm, in various earthy shades of pink, brown, grey and yellow, with eerie dye pots steeping away and smells that really stuck in the nostrils - pungent at best, downright sickening at worst - almost put me off. But my desire to explore was stronger and I couldn't help but feel convinced that there must be a way to get the pretty without the icky...

I took some starter guidance, lots of inspiration and a little pointing in the right direction from a few lovely accomplished sources in books, blogs or other social media forms. I'll come back and share some reference links at the end for particularly helpful resources if you fancy investigating too.
I've a long way to go on my journey regarding the pre treatment of the fabrics. For this first simplistic stab, deliberately using things I had easily to hand, I 'scoured' my cotton sheeting using just a very hot detergent wash and some washing soda soaking. In lieu of any proper mordant, I then soaked, rinsed, dried & resoaked a few times in unsweetened soya milk. I was too impatient to let it cure properly this time, but my next batch will have had longer.

Taking more care in these preparation stages would definitely generate a more even and/or fibre-fast dye colour if that is important to you - I'm only planning to use small bits in my scrapcrafting projects for now, so even tones, pure colours or even carefully managed ones, or wash fastness are not important to me at this stage.
My dye extractions mostly took the form of simmering & steeping the organic ingredients for an hour or two in water in a steel cooking pan on my regular stove. Again, I'm deliberately starting super simple and quick; more intense results come with more intense effort.

To apply the dye, I soaked damp pieces of the white cotton fabric in the colour baths, sometimes with dye ingredients still in, sometimes not; sometimes with heat still simmering, sometimes not. Mostly for about an hour or two and with minimal swishing about. (This was all alongside a weekend of family home activities - my scientific controls were decidedly feeble compared to my university lab days. I'm mostly quite impressed with myself that I kept track of which sample came from which dye bath and what was in them!)

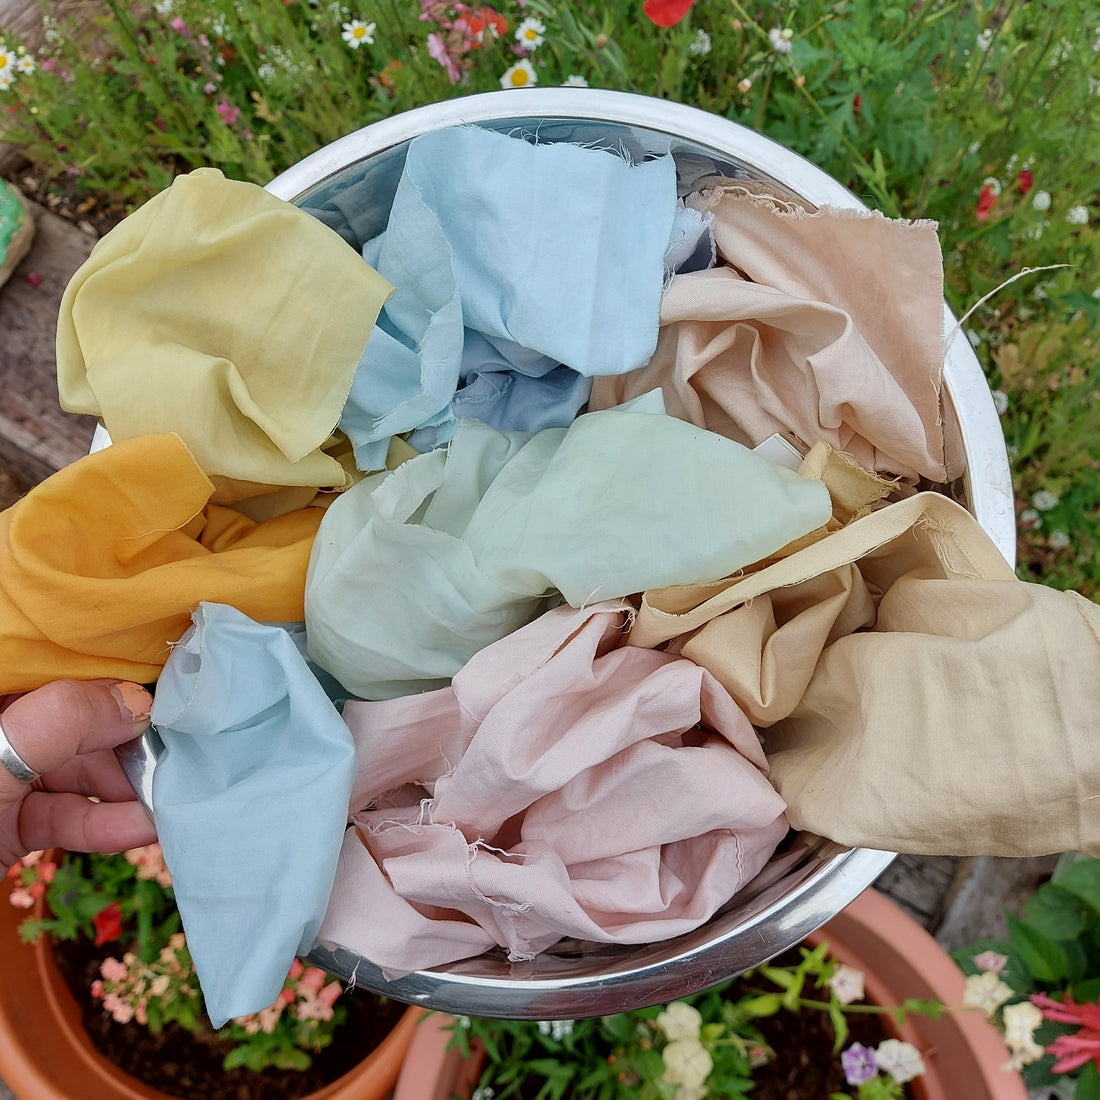
So what WAS in the dyes?!
1. Avocado skins & stones, flesh all scraped away, gave the well-documented beautiful pinky colour that I was so excited to see, which then dried to a gorgeous peachier tone. I'll be making more.
2. Tea. A handful of used teabags quickly gave the expected famous tea-stained sepia beige effect. Lighter or darker deeper tones will be possible with shorter or longer soaks.
3. Red onion skins - mostly the papery outer layers but with some of the first flesh too - gave a peachy yellow tinged dye colour, which has dried out to something similar to the tea. I want to revisit this one.
4. Red cabbage. I actually used some frozen red cabbage, chopped and stored from an excess supply this winter. Being June, it was impossible to get another for the purposes of pictures so the jar you might see in my posts is just representing! A lovely purple dye liquid and initial colour paled out quickly to various tones of blue and almost turquoise. I need to do a more careful experiment this one to see how longer or shorter dip times affect the tone. It's not always logical but it is always pretty.
5. Turmeric powder from the spice rack gave a lovely deep gold which paled on drying to a nice sunshine yellow - possibly due to the very unscientific inclusion of some fresh oregano leaves to the dye bath.
6 & 7. The final two pieces are the results of mixing and/or sequential dipping in the red cabbage dye bath and the turmeric one. There's potential for nicer green results here with a bit more care and a bit less slinging things around to see what happens at the end of the day.


Overall... interesting, great for my craft scraps basket AND pretty without being too icky!
Part two will cover dyeing with some botanical ingredients from my garden and local hedgerows. I feel like seasonal variations will be needed too as different produce - fresh berries and roots veg particularly - become available.
Can I keep my drip & stain free record clean till Christmas, do you think?!
#PeaceandCraft @peaceandcraft